Building a hexapod robot – from nothing to a first platform

Hi All,

back to my blog series about my hexapod robot that I’m working on for about 7 months now. This is the continuation of this article about servo control, leg prototypes and inverse kinematics

The platform

At first I tried to build a platform and legs from wood of which I found out very early that it’s not sturdy enough while being a lot too heavy. Then I went with parts of a cable duct which were really light but much to easy to bend.

I decided early that I needed something tougher. I went with steel from my local diy market and came up with this…

adding a bit of plastic from an old cable duct, plastic spacers and all electronics I figured I would need, this was the first platform:

intermission: purposes

the main reason to build this robot learning. I wanted to learn about electronics, raspberry pi, math and geometry, python and many other things.

But the robot also needs something to do. Just walking was not an option as that seemed “too simple” to me when I first thought about that (it is not!). So here are the missions I was thinking about:

Follow a light

The idea was to use 3 pipes, each with a light depending resistor inside and attach it to a servo. If the left pipe receives more light, move the servo to the left and so on. If both receive the same amount of light, read the servos current value and turn the robot until the servo is in a zero position. If unclear, traverse from left to right. That was surprisingly easy (in this video I have turned on the flashlight of the phone to act as an attractor)

I don’t even know why I abandoned the idea. It’s still there and would be easy to implement.

Avoid obstacles

another classic for robots. Walk along until you get too close to an obstacle, then turn around and find your way around that. That’s one thing that will be possible with the current design

Identify and climb stairs

That’s a tough one. Identifying stairs and climbing them is quite a logical challenge to solve using only distance sensors. Not sure, if this will be done

Go “somewhere” autonomously

The robot would need to identify where it is and then autonomously find it’s way to the destination. That’s another nasty one of which I have no idea how to implement.. Sounds very interesting though

…to be continued….

Quickfix: Pentaho client tools and the Java MySQL connector

Hi all,

when you want to install the Pentaho client tools to your machine and you have trouble connecting to a MySQL database, there are a few things to keep in mind:

1. the Pentaho-Tools do not ship with a Java MySQL connector. You have to download it from the MySQL website.
2. the latest connector from the MySQL website does not work (versions 8.x)
3. mysql-connector-java-5.1.47 works well for me. Install it by copying it into the respective “lib” / “lib/jdbc” folders

Then your client tools should be working fine.

cheers

Andre

Quickfix: Import your nextcloud addressbook into twinkle

Hi All,


I just switched to the twinkle-softphone and found that there is no way to import anything into the addressbook. I am currently learning python so I thought this is a nice little project to work on. Note that this only works on python 2.

Tested on Ubuntu 16.04LTS, Ubuntu 18.04,  Nextcloud 13 and TWINKLE 1.9.0

It works for me and may not work for you. Please comment if you have any issues with this.


#twinkle addressbook importer for nextcloud

nextcloud_protocol="https://" 
nextcloud_username="your_nextcloud_username"
nextcloud_password="your_nextcloud_password"
nextcloud_url="the_nextcloud_url"

#############################################################
import urllib
from os.path import expanduser
import os.path
from shutil import copyfile

# get the home path
home = expanduser("~")

#build the twinkle addressbook path
twinkle_phonebook_path=home+"/.twinkle/twinkle.ab"

#create a backup if a file exists
if(os.path.isfile(twinkle_phonebook_path)):
    copyfile(twinkle_phonebook_path, twinkle_phonebook_path+".bak")

#open the addressbook file
file=open(twinkle_phonebook_path,"w")

# build the nextcloud URL
url=nextcloud_protocol+nextcloud_username+":"+nextcloud_password+"@"+nextcloud_url+"/remote.php/dav/addressbooks/users/"+nextcloud_username+"/contacts?export"

#load the VCF Data
try:
    response = urllib.urlopen(url)

except:
    print("Error!");
    exit()

else:
vcf = response.read()

#go through the lines in the vcf-document 
for line in vcf.splitlines():

    #check if it's a "full name" line
    if line.startswith("FN"):
        r=line.split(":")
        full_name=r[1];
        names=full_name.split(" ")
        first_name=names[0]
        if len(names)==1:
            last_name=""
        else:
            last_name=names[1]

    #check if it's a phone number line
    if line.startswith("TEL;TYPE"):
        r2=line.split(":")
        phone_number=r2[1]
        r3=r2[0].split("=")
        phone_type=r3[1]

        #write new line to file. 
        this_line=last_name.strip()+"||"+first_name.strip()+"|"+phone_number.strip()+"|"+phone_type.strip()
        file.write(this_line+"\n")

#close the file
file.close()


Quickfix: Fixing basti2342’s retweet bot

Hi All,

just a really quick one: basti2342’s retweet bot (found here) is missing a configuration file for it to work. The file in question should be called “config” (no extension) and be put into the root directory of the bot (along with the retweet.py file). The contents should be as follows:

[settings]
search_query:#hashtag
# Leave empty for all languages
tweet_language:
number_of_rt:10

[twitter]
consumer_key:consumerKey
consumer_secret:consumerSecret
access_token:accessToken
access_token_secret:accessTokenSecret

In addition you might have to install configparser

pip install configparser

With that, your bot should run smoothly

Cheers

Andre


Building a hexapod robot – more building and a lot to learn

Howdy all,

here I continue my report about the hexapod robot journey.

more building and a lot to learn

So I had a couple of problems to tackle

  • too many cables
  • randomly moving servos
  • learn python as the language of choice for robotics on a pi
  • build a better prototype leg
  • how the hell does a “step” work for a robot leg?

Too many cables and servo jitter

Moving servos using the GPIO ports and simulate a PWM signal with them is just a lot of work and absolutely unreliable. A bit of research brought me to this little toy: The PCA9685, a I2C driven servo motor controller.

It can run 16 servos per unit and has a external power supply so the servos are not run by the Raspberry PI’s internal power. It is controlled by the I2C bus on the Raspberry Pi, so it really only needs four cables to work. This is the tutorial I used to get started with the controller. If you are planning to buy one, make sure you buy one with pre-installed pins 🙂

Build a better prototype leg

so I started looking for better servos and a good way to build a leg from them. With normal servos like this  it’s really hard to attach something to it. I wanted to avoid using 3D printed parts as I wanted my bot to look self-made and punky. After more searching I found these

servos that have a though-going axis and aluminum brackets delivered with them. Using a couple of 3mm screws I was able to create a leg prototype that looked really nice.

I added a push-button to the end of the leg just for testing if this would make sense. I thought I could use it to find out, if the leg has actually touched the ground.. Did it work? We’ll see in a later chapter.

How does a “step” for a robot work

OK so we have three servos. Basically a hip, a knee and an ankle. The shoulder is turned 90° for forwards/backwards motion.

I was never really good at maths, so I figured that somebody must have done this before. Kudos to Oskar Liang for putting this together.

After a bit of fiddling around, the leg started moving somewhat natural, so I decided that now it’s a good time to put together a hexapod.

…to be continued…

Building a hexapod robot – the beginning

Howdy folks,

in my portfolio it says that I am exploring robotics and I have spent half a year now trying things out, building and rebuilding prototype legs, platforms and learning python. Well: I do have a blog and I thought now it’s a good time to share my experiences so far. Unfortunately my phone broke along the way, so I do not have many pictures of the early stages of the project.


The beginning

I started the project in June 2017 without a real plan, what I wanted to do. I knew that I love the raspberry-concept and that I hate, when after-work projects stay inside the computer. I love it, when I have some kind of interaction with the real world. I have already done a few projects with IP Cameras and gphoto2 and I always wanted to do more of interaction and not only consumption.

OK – let’s see if I can move a servo.  So I ordered a set of really cheap servos, a breadboard and a raspberry pi zero W on amazon. I did a bit of Google research and found that you can easily control a single servo using the standard GPIO ports of the PI. I quickly noticed that this is not really feasible.

  • The servo does a lot of unintended movement
  • There is a LOT of cabelling involved and things get complicated and error-prone really quickly
  • as soon as the servos drag too much power, the pi will probably explode

But hey – the servo moved and I got caught in the cobweb of mediocre electronics. So I started to build a simple leg using a bit of plastic, wire and hot glue and was able to more or less control it through the GPIO ports.

Leg Prototype

After a bit of fiddeling around, I was able to move the leg the way I wanted.

OK that really caught me. My brain was boiling with legs, platforms, API’s, AI,… The plan to build an autonomous hexapod robot was born…

….to be continued….

PCM17 – the Pentaho Community Meeting 2017

Hi All,

this Saturday, the #PCM17 takes place in Mainz, Germany. PCM17 is the Pentaho Community Meeting that takes place at different locations around the globe. As it happens “around the corner” this time, I will be there and I am so excited. This is the 10th time it happens and there are so many interesting talks. As there are two different “Tracks” – Business and Technical, I will have a hard time deciding where to go – I will mostly stick to the technical track though.

There are talks about the separation of business- and IT rules in ETL Jobs, “Serverless” PDI and Machine Learning, a topic I am specifically interested in.

And – hey – CERN is talking and if there is anybody in the world that generates a lot of data it needs to handle, it’s CERN.

IT-Novum, who is organizer of the event, will do extensive blogging, so I will just lean back and enjoy the show – nothing to expect in my blog.

Follow me on Twitter for comments, impressions and pictures.

Cheers

Andre

Re-Post: Inverse Kinematics Basics Tutorial – Oscar Liang

This tutorial was re-posted from http://oscarliang.com, an amazing resource about robotics and drones. Check them out and follow them on twitter.

Inverse Kinematics Basics Tutorial – Oscar Liang

What is Inverse kinematics in robotics? With your robot having legs the position of those legs dictates where its feet are. Where its feet are dictate its point of balance.

As you might know “balance” can be defined as the robot’s centre of mass (affectionately referred to as its centre of gravity) being between its centre of pivots (i.e. the edges of where its feet contact the ground). If the centre of mass is above the centre of pivots and between them the robot will balance (almost an unstable equilibrium, if you’re an applied mathematician. If the centre of mass is above but outside the centre of pivots (i.e. beyond the edges of his feet) the robot will overbalance and fall.

If you feel confident about the Inverse Kinematics basics, you can jump to

Implementation of IK on Hexapod robot:

https://oscarliang.com/inverse-kinematics-ik-implementation-for-3dof-hexapod-robot/

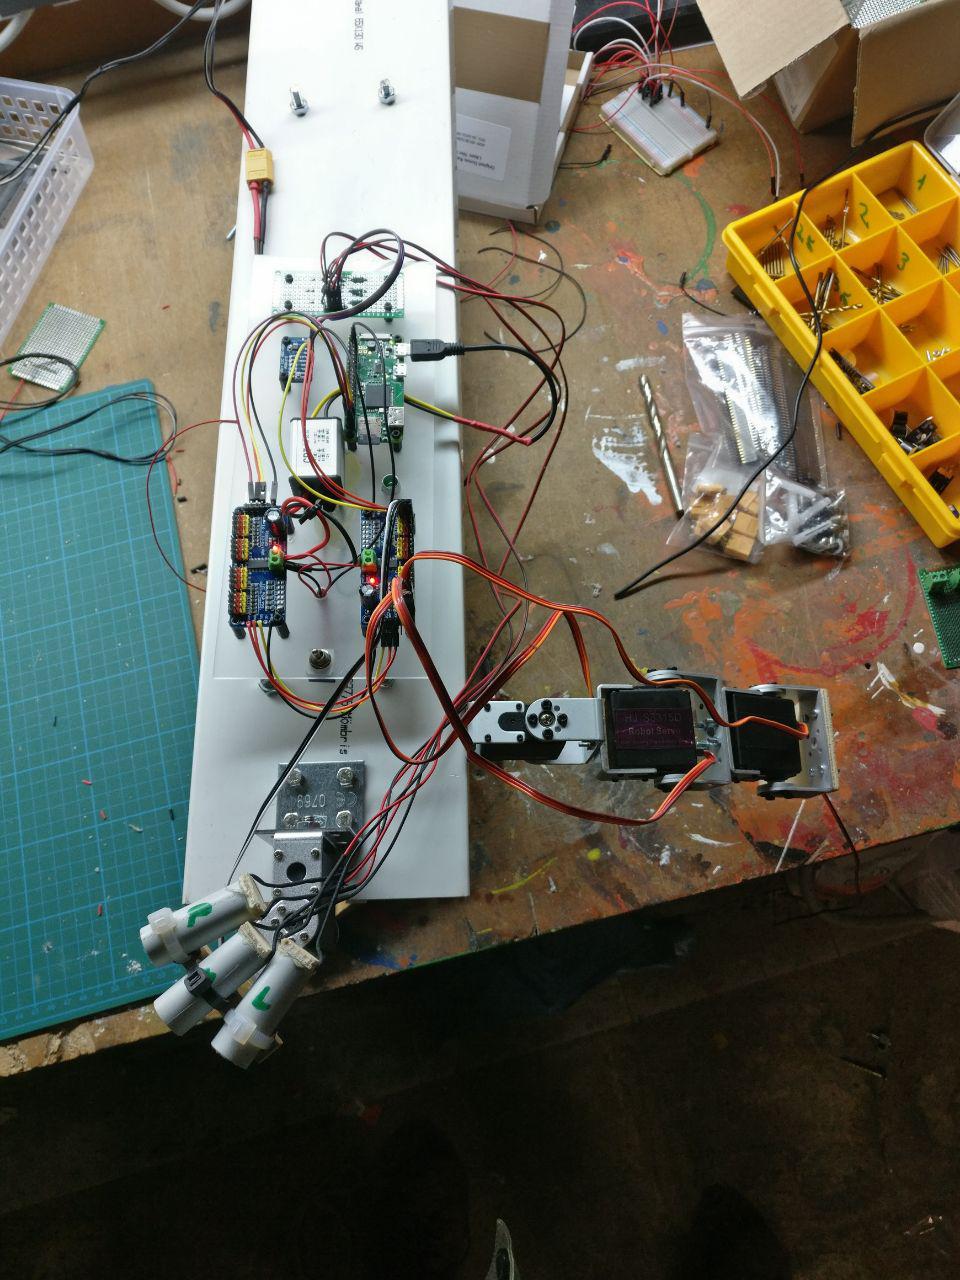
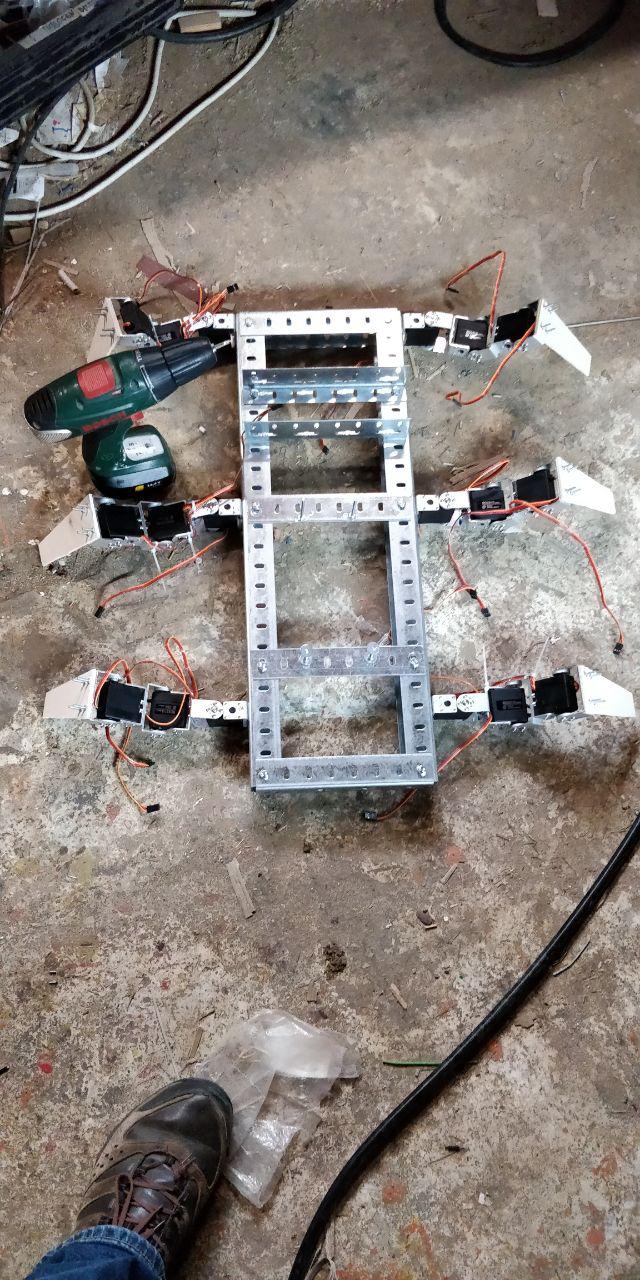
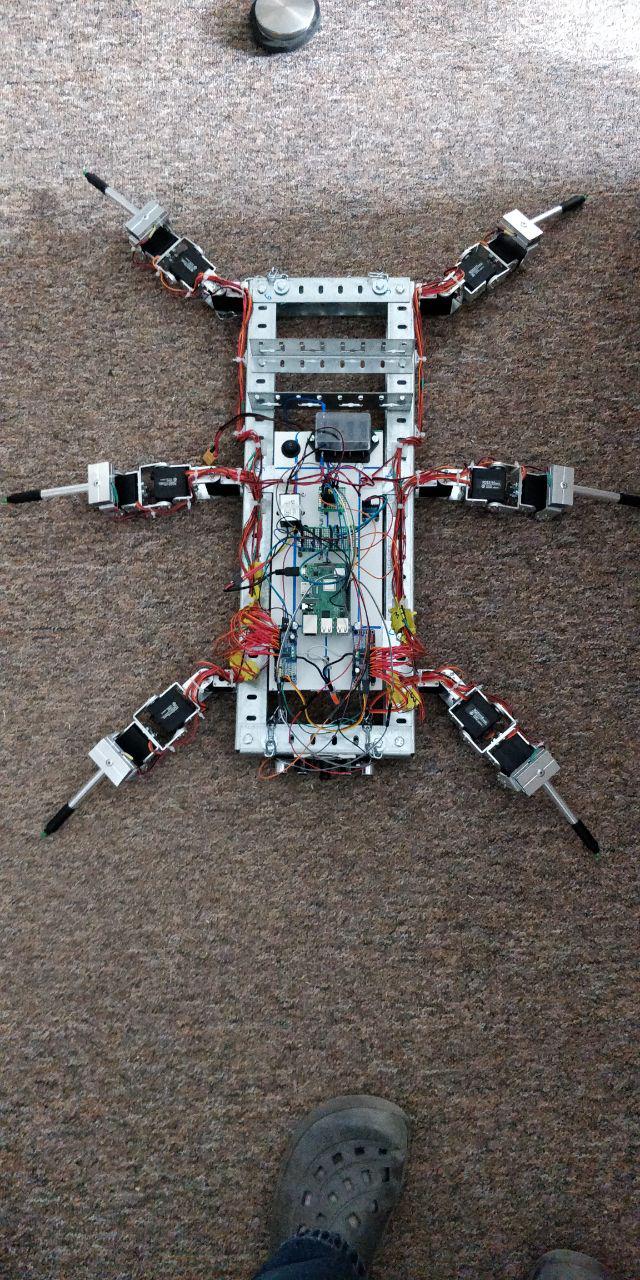
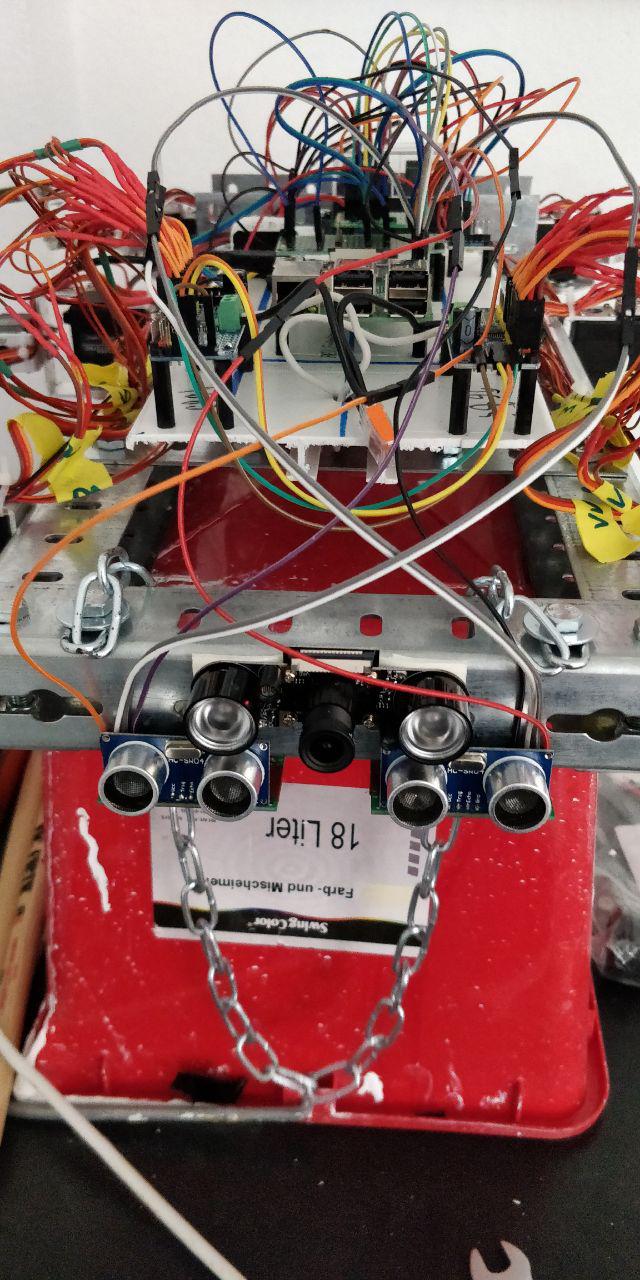
here is an implementation of a 3 DOF hexapod robot which I built using IK: 

https://oscarliang.com/hexapod-robot-with-3-dof-legs-degree-of-freedom/

Kinematics and Robots?

If you’re a little unclear about Robot Kinematics, I recommend to start with something basic, a cube is a good start, and imagine that its centre of mass is right in the middle (which it will be if its density is even throughout). When the cube is just sat there it’s stable. The centre of mass is above the centre of pivot (the edges) but because it’s between them (when viewed from every direction) it will just sit there until you prod it.

Now you prod it and slowly tilt it. As the centre of mass approaches a point directly above one of the edges (our centre of pivot) the cube will feel lighter to your touch and if you can get the centre of mass directly over that centre of pivot it will balance. As soon as you push it past that point, so the centre of mass is the other side of the centre of pivot it will fall.

The robot is exactly the same. This is why the kinematics of the feet are important to you. If you want the robot to balance dynamically you NEED to know where the feet are and where they’re going to need to be. Please understand that I’m not going to do all your work for you, so the code or equations I share are not guaranteed on their accuracy but purely a demonstration of how the method is derived and works.

Forward and Inverse Kinematics – FK & IK

Forward kinematics is the method for determining the orientation and position of the end effector (x,y,z) coordinates relative to the centre of mass , given the joint angles and link lengths of the robot arm (servo positions). This equation is deterministic. You know absolutely from the servo positions exactly where the foot is.

Inverse kinematics is the opposite of forward kinematics. This is when you have a desired end effector position, but need to know the joint angles required to achieve it. This is harder than FK, and there could be more than one solution.

The FK is not very useful here, because if we are given a change of angle of a servo, only one effector moves in the chain. But if we are given a change of coordinate, the whole chain of effectors (servos) might have to move a certain angle for the end point to reach the desired position. And also the movement tend to be more natural as well!

Approaches To Solve IK

There are two approaches to solving inverse kinematics:

  • Analytical – requires a lot of trigonometry or matrix algebra
  • Iterative – better if there are lots of links and degrees of freedom.

Analytical approach

If there are only two or three links then it may be possible to solve it analytically. One possibly might be to draw out the arm with the angles shown on it, then solve for the angles using geometry. The problem is that this is not really a very general approach.
Another analytical approach is to represent each links rotation and translation by a matrix. The end point is then given by all these matrixes multiplied together, so we just need to solve this matrix equation. Then find what rotation each matrix represents.
There may be many solutions or there may not be any solutions. In other words there are lots of ways to reach to a given point, or it may be out of reach.
If there are many solutions, then you might need to apply additional constraints. For instance, human joints can only bend within certain limits.

Iterative approach (not important)

This is a more general approach for programming complex chains. It might be useful if you are building a snake robot or only if you are interested reading. :-p
Start off with the joints in any position, then move each of the joints in turn, so that each movement takes the endpoint toward the target
Starting with the joint nearest the end point, rotate the joint so that the current end point moves toward the required end point. Then do the same with the next joint toward the base and so on until the base is rotated. Then keep repeating this, until the end point is close enough to the required end point or if further iterations are not moving it closer to the required point.
It may be possible to have a more realistic strategy than this, for instance, if I am using my arm to pick up an object then, if the object is a long way away, I will move the bigger joints in the arm, then as the hand gets closer the smaller joints of the hand are used for the fine adjustments.
The angle of rotation for each joint is found by taking the dot product of the vectors from the joint to the current point and from the joint to the desired end point. Then taking the arcsin of this dot product.
To find the sign of this angle (ie which direction to turn), take the cross product of these vectors and checking the sign of the Z element of the vector.

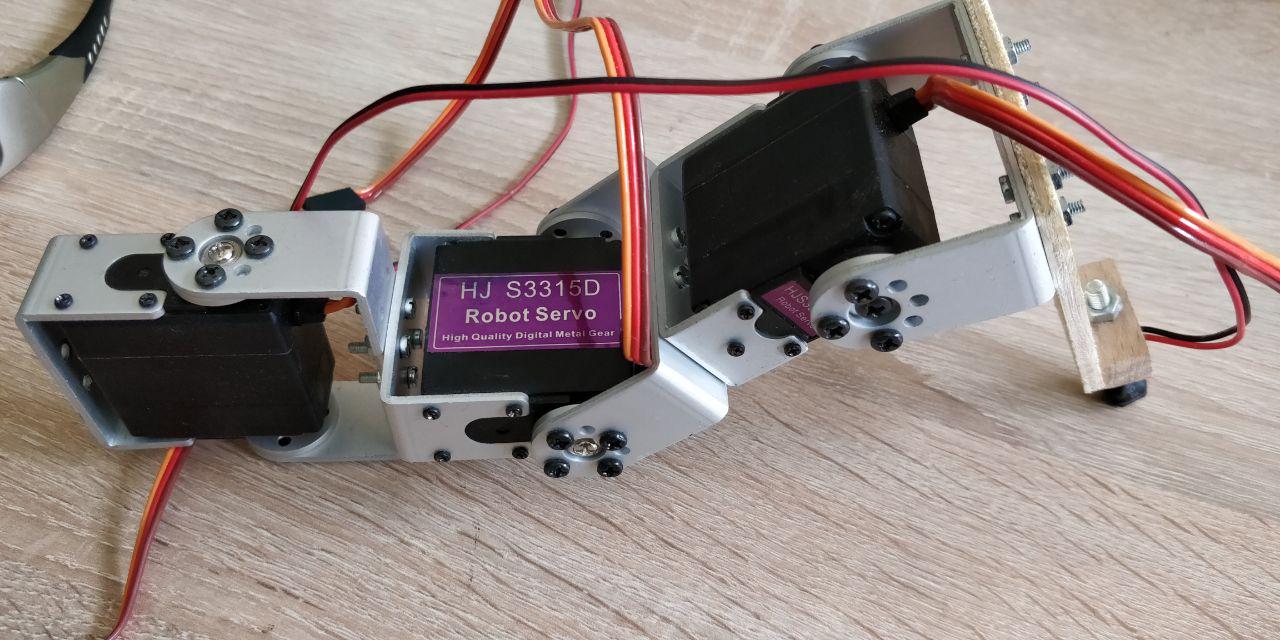
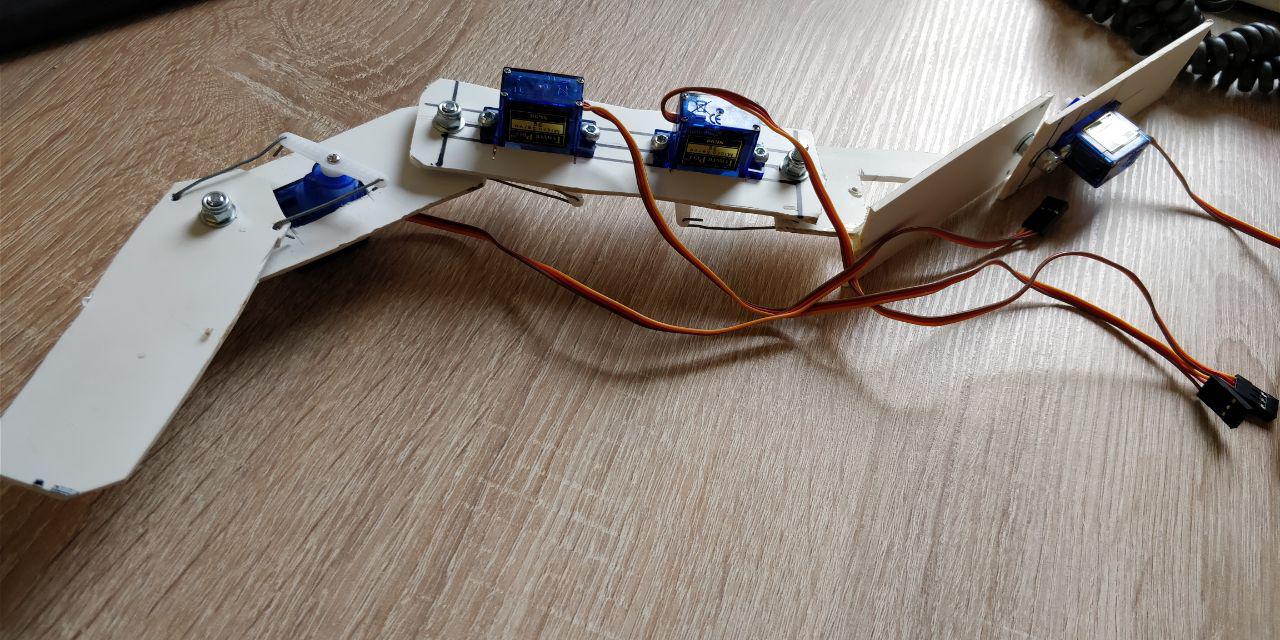
Because we will be mainly dealing with 3DOF hexapod or Quadurped robot legs, Analytical, or simple trigonometry would do the trick for now.

Some Real Work

Enough theory, to turn this into progamming language, you’ll have to remember that the angles are unknown, and we need to work it out using equations and trigonometry.


leg planes

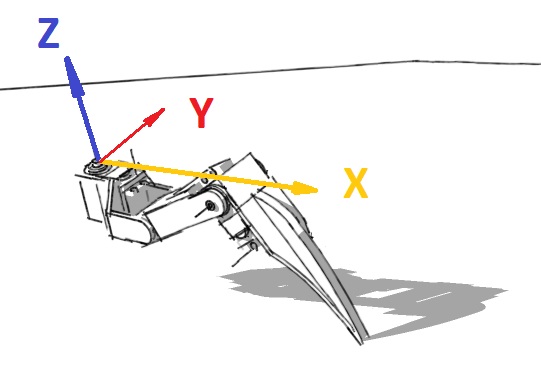
So, first thing is going to be simplify this problem from 3D into two 2D problems, to solve for α (alpha), β (beta) and γ (gamma).

Inverse Kinematics tutorial oscar

2-IK-side

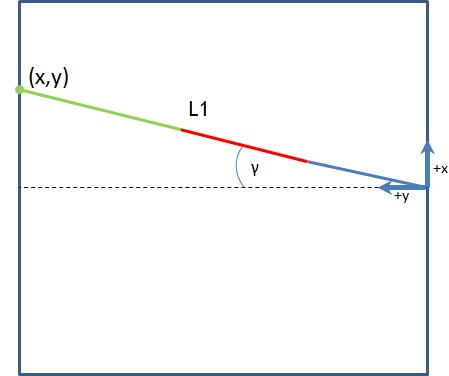
Gamma is easy, from diagram one, we have:

3-gamma

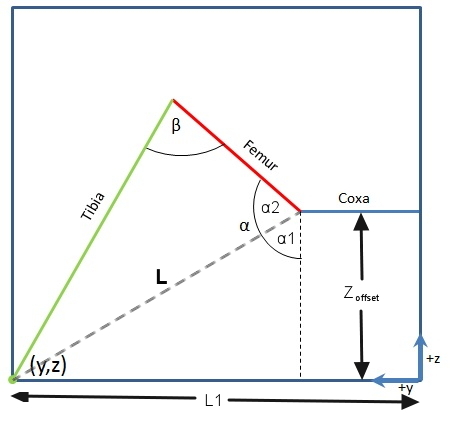
Now that you have gamma, you have two more angles to solve (and they are in the same plane)let’s move on to the second diagram.

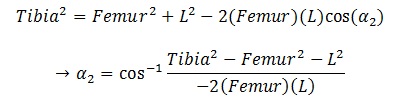
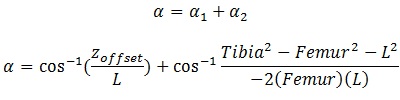
Alpha is a bit tricky, so I tend to split it into Alpha1 and Alpha2.

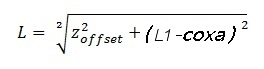
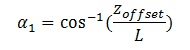
We can get Alpha1 by working out L first.

1

6


For Alpha2 and Beta, we need some help from Cosine Rules:


Cosine_Rule


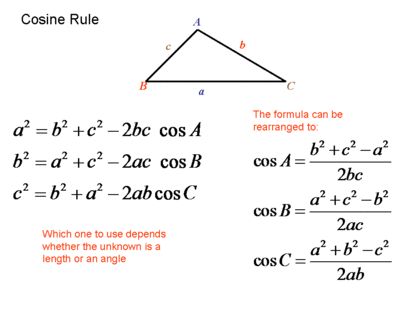
From these formula, if we know 3 sides of a triangle, we can find out any angles inside it. Don’t doubt it, it just works! 🙂

So now we have Alpha2,


7


And Alpha is


8


And Finally, Beta


9


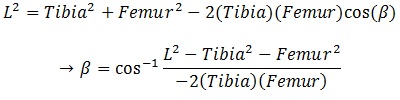
At that point, you have your values for your servos!

Source: Inverse Kinematics Basics Tutorial – Oscar Liang